Sunday, August 28, 2011

Waiting out the storm with a homemade pasta experiment

Well, Hurricane, um, er, Tropical Storm Irene has pretty much come and gone. In our area, there isn't much sign that she was here. Our lights stayed on and our trees are still standing. We saw plenty of rain and it's still a little windy, but all in all, it was a low key day at home. We watched plenty of Instant Streaming on Netflix - we started watching 'Scrubs' from the pilot episode. Everyone needs a little mindless comedy.

Since we had so much time on our hands and the electricity was working, I decided to experiment with homemade pasta. It was inspired by a show on the cooking channel with Mario Batali. He was visiting a few restaurants where they were making homemade pasta. I decided to give it a shot - I had time and I wasn't going anywhere.

Handmade macaroni was a specialty of my grandmother's, and my mom is an expert at homemade ravioli. They spent years rolling out pasta by hand - no pasta machines necessary! That's the method I used as well. To go along with the handmade macaroni, we needed sauce (gravy as my husband would call it) and meatballs. Both made from scratch, too. The sauce and meatballs were my husband's contribution - they are his specialty.


The end result was absolutely delicious. I highly recommend that everyone try making pasta from scratch - it has a flavor and texture that can't be replicated through mass production.


Here's the recipe I used for the macaroni dough:
1 1/2 cup flour
1 egg
1 egg white
1 tbsp olive oil
1 tsp salt
1 tbsp water


Combine flour and salt in medium size bowl. Combine wet ingredients in separate bowl. Create a small well in the center of the dry ingredients. Pour wet mixture into the well. Begin mixing the wet ingredients with a for slowly incorporating more and more of the flour until incorporated. Finish mixing with hands.

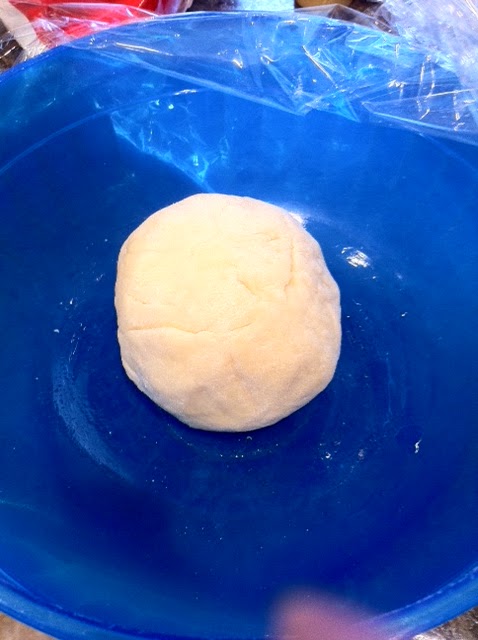
Move dough to floured work surface and knead until shiny and elastic. Add small amounts of flour during kneading if dough is too sticky. Form a ball and place dough ball into a bowl. Cover with plastic wrap. Let rest for at least 10 minutes at room temperature.


When ready to roll out the macaroni, remove from bowl and place on floured work surface. Flatten ball into a small disc with hands. Using a rolling pin, roll from center out, repeating until thinned. Occassionally turn disc so as to thin equally. Add flour to surface should dough begin to stick. Roll out until dough is paper thin.

Once dough is thinned and not sticky, roll dough onto itself lightly from one edge to the other, until completely rolled. Beginning at one end, begin slicing 1/8 inch sections - chiffonade style.

Shake out cut pieces into long thin strips. Lay out on wax paper to dry. Macaroni can be placed in freezer to store.

When cooking the pasta, the pasta will cook quickly - within 5 minutes in boiling water. Drain and then top with your favorite sauce and enjoy!

The pasta can be used for ravioli as well. Instead of rolling and cutting, leave the thinned pasta in the sheet form.

Hurricane Eve Pizza: Nana's Pizza

On the eve of Hurricane Irene, we decided we would order a bunch of pizza so we could have leftovers should the power go out. (Read = we didn't feel like cooking!) We had my in-laws over so we needed a place that would have Gluten Free options for my father-in-law. We decided to try out Nana's Pizza in Everett, MA, since it was closest driving distance. (Well, if you don't count the 20 minutes my husband got lost picking up the pizza, it was the closest.) 

It was excellent! Even the Gluten Free Pizza was very good according to my father-in-law. I also sampled the Gluten Free Chicken Wings and they were quite tasty. There are more and more restaurants with Gluten Free options, but it is still challenging to find something that tastes good. Nana's Pizza did a great job. 

Their other menu options were also excellent. We had a regular cheese pizza, mushroom and pepperoni, all of which far exceeded our expectations. We also sampled one of their Specialty Pizzas - the Zsa Zsa - it was bellissimo! One of the best pizzas that we've had recently. It is a white pizza with fresh tomato slices, ground garlic, oil and a topped with a four cheese blend. I highly recommend it!

Today we're riding out Hurricane Irene at home. We have a TON of leftover pizza, so we'll see how it does when it's reheated. For me, I like to eat it cold! That will be a good thing especially if the power goes out!

Hope everyone is staying safe in this hurricane!

Monday, August 22, 2011

Go-to Grilled Pork Chops - easy enough for a Monday night!

Go-to Grilled Pork Chops

My husband and I try to plan our weeknight meals in advance so we don't have to run around after work during the week getting ingredients and deciding what to have for dinner. We go to the grocery store on the weekend, so we sit down beforehand and decide what meals we want to have for the week and develop the grocery list from there. Don't get me wrong, we change our minds sometimes mid-week, or we run out of an ingredient and need to do a mid-week grocery run. But for the most part, our advance planning helps keep our household running during the week. If we didn't plan, we'd constantly be ordering out or going out to dinner since things tend to get very hectic during the week. 

Depending upon what good deals we might come across at the store or if we change our minds mid-week, we often end up with a random collection of items in our freezer at any given time. Every couple of weeks when we make our meal plan for the week, we look to see what is in the freezer first. Most likely we have enough meat for a couple of meals hiding in there.
For instance, tonight's dinner of Go-to Grilled Pork Chops were chops that I picked up a few weeks ago during a stop to a specialty store that I don't normally get to on a regular basis. Since I was off from work while I was between jobs, I made it a point to stop in there. I picked up two, two and a half inch boneless pork chops knowing exactly what I wanted to make with them - eventually. So, tonight was the night!

The first time I made the Go-to Grilled Pork Chops they evoked the following statement from my husband, "I would order these in a restaurant. These are restaurant-quality." Needless to say, after a statement like that it becomes challenging to serve food each night that lives up to those expectations! But, you can never go wrong with the Go-to Grilled Pork Chops. They are simple and easy to prepare with few ingredients, and are the best pork chops you'll ever have!


Go-to Grilled Pork Chops
Ingredients:
2 2.5 inch boneless pork chops (leave fat on; do not trim)
1 tsp fresh rosemary, minced
1 tsp fresh thyme, minced
2 cloves fresh garlic, minced
1/4 tsp kosher salt
1/4 tsp fresh ground pepper


Combine rosemary, thyme, garlic, salt and pepper in a small bowl or on cutting board. Using your hands rub herb mixture on both sides of pork chops.
Place on top rack of outdoor grill over indirect heat. Cook over indirect heat slowly until cooked through to desired doneness, turning halfway through (approximately 25 minutes total).

Enjoy!

Sunday, August 21, 2011

Sunday Afternoon Experiment: Cooking Light's Shrimp Fettuccine Alfredo

The past couple of weeks have been a bit of a whirlwind! With starting a new job, I haven't done too much cooking, well, experimenting in the kitchen at least. With my new job, I took it easy on the weeknight meal front, and then ended up traveling to Florida for training, so wasn't able to cook. We did manage to sneak in a little family entertaining for  few nights, but that consisted mostly of basic grilling: marinated steak tips, chicken, burgers, and dogs. Since this weekend was free, I have been able to catch up on some house work and had time to test out a Cooking Light recipe from this month's issue: Fettuccine Shrimp Alfredo.

The recipe came out really delicious - both my husband and I agree. It was big on flavor even without all the fat that is often in Fettucinne Alfredo. The Cooking Light version is made with lighter ingredients, keeping the total fat count down but with big flavor.

The thing that I like about the recipe is that it is really easy and super fast. Obviously shrimp take hardly any time to cook so that contributes to the speed and ease of the recipe, but the key is the fresh refrigerated pasta that cooks in 4 minutes!! I hadn't ever thought to use fresh pasta from the refrigerator case, but the recipe called for it, and it came out great!  I will definitely be using that as a recipe shortcut and weeknight meal time saver.

If you do try the Cooking Light recipe, I recommend adding salt and pepper when sauteing the shrimp, and then when making the pan sauce. Cooking Light often doesn't mention that as a step in the recipe, so do keep that in mind. It will definitely boost the overall flavor of the recipe. Also, if you can't find Parmigiano-Reggiano, you can subsitute grated Parmesan. I did, and the recipe still tasted fantastic.


In the magazine, they suggested serving the Shrimp Fettuccine Alfredo, with Roasted Asparagus:
Ingredients:
1 pound asparagus, trimmed
2 tsp olive oil
1/8 tsp ground red pepper
1/4 tsp salt

Combine olive, salt, ground red pepper, and asparagus on a jelly-roll pan. Bake at 450 degrees for 6 minutes or until crisp-tender. Serve with lemon wedges.

For the asparagus, I substituted fresh ground black pepper for the red pepper, and it came out excellent. Flavor was excellent without the heat, which is my preference.

Hope you get a chance to try these recipes! I'd love to hear how you like them and what variations you come up with.

Enjoy!


Wednesday, August 3, 2011

Chocolate Toffee Squares to celebrate the end of an era and the beginning of another

It has been a little while since my last post, but I have been busy. Of course! Who isn't? I traveled to Maine over the weekend to celebrate my Mom's 65th birthday. It was fabulous time with great weather and the chance to visit with family that I haven't seen in a while. I have wonderful relatives including 3 nephews and a niece that are a constant source of entertainment. My niece's name is Emily and I don't think it is a coincidence that the first hurricane of the season the weather professionals are watching is Hurricane Emily. Just kidding, she's really sweet and extremely smart. No doubt, we're related!


Today was my last day at a job that I have worked at for 3 years. It was bittersweet to say good bye to so many wonderful people and friends that I have made over the past 3 years. But I am comforted in the fact that I am leaving to move on to a new and exciting position at a new company. I have a few days off before I start my new job, and I plan to spend my time relaxing and shopping! I'll probably fit in some cooking and baking, too, since those are my all time favorite pastime.


Tonight I am making Chocolate Toffee Squares to bring to some friends I haven't seen in a while when I visit them tomorrow on my first day off. This is a really easy recipe that has always been a big hit. I will give credit to my mother-in-law for sharing the recipe and technique with me. (though, I am sure she got the recipe from her friend, Karen...)


I hope you and your friends enjoy this recipe as much as we do! Enjoy!
 

Chocolate Toffee Squares

By: Nicole Bonfiglio

Ingredients:

Butter – 2 sticks
Sugar – ¾ cup
Saltines – 1 sleeve
Chocolate bits – 11.5 oz. bag
Chopped or diced walnuts – 1 cup

Preheat oven to 400°.

·        Line cookie sheet with aluminum foil and place 1 sleeve of crackers in one layer with the edges touching.
·        Once oven is heated, in a microwave-safe bowl, combine the 2 sticks of butter and ¾ cup of sugar.
·        Melt mixture in microwave, in 1 ½ minute intervals, stirring between intervals. (Heat in microwave until frothy- takes about 3 times in microwave. Be sure to watch it in microwave or you will end up with caramel!)  
·        Remove from microwave when melted and stir well.
·         Spoon butter and sugar mixture over crackers.
·        Put the cookie sheet in the oven for 5 minutes.
·        Remove from oven and quickly re-arrange crackers so that all crackers are touching.
·         Immediately cover crackers with chocolate bits.
·        Let bits partially melt, and then smooth over with knife or spoon, covering all the crackers.
·        Sprinkle with nuts as desired.
·        Remove squares from foil with a spatula and place individual squares on clean cookie sheet.
·        Refrigerate for at least 2 hours. Remove from pan and arrange in muffin baking cups or wax paper.  Enjoy!

Makes about 30 squares.